How To Setup WiFi Hotspot on your PTBooth computer
PLEASE NOTE! The information provided in this article is based on the assumption that you posess the required knowledge in order to operate the PTBooth A1 PRO
Knowledge and abilities required in order to operate PTBooth A1 PRO
SHORT SUMMARY:
Setup WiFi Hotspot on your PTBooth computer
(for the PTBooth Transfer App functionality)
1. Connect your WiFi Router
2. Setup your WiFi Router
3. Check your computer Network Settings
4. Determine your IP Address
5. Test your WiFi Hotspot
All WiFi Routers Are Supported by PTBooth A1 PRO (PTBooth Transfer App)
In order to operate, the PTBooth Transfer App requires the WiFi Hotspot created on the computer where the PTBooth A1 PRO is installed.
You can create the WiFi Hotspot with or without WiFi Router.
During the extensive testing period we have determined that a WiFi Router is the best solution for operating the PTBooth Transfer App efficiently.
Therefore, we recommend to use a WiFi Router.
What WiFi Router do I need?
The type and brand of the WiFi Router is completely up to you!
In Photo Booth application the following WiFi Router features affect the performance of PTBooth Transfer App:
Range of Wifi
WiFi signal Strength
Ability to handle multiple WiFi connections
WiFi bands that will be supported by phones and tablets
Ability to setup Guest Network
Easy to setup and operate
NOTE! This article is desribing the process of how we are creating our own WiFi Hotspot using TP-LINK Archer C7 Router
The following PARAMETERS COULD BE DIFFERENT in your particular situation:
WiFi Network NAMES (SSID)
Guest Network access (if you have the ability to setup Guest Network on your router)
IP Address of your computer
How To Setup WiFi Hotspot on PTBooth computer
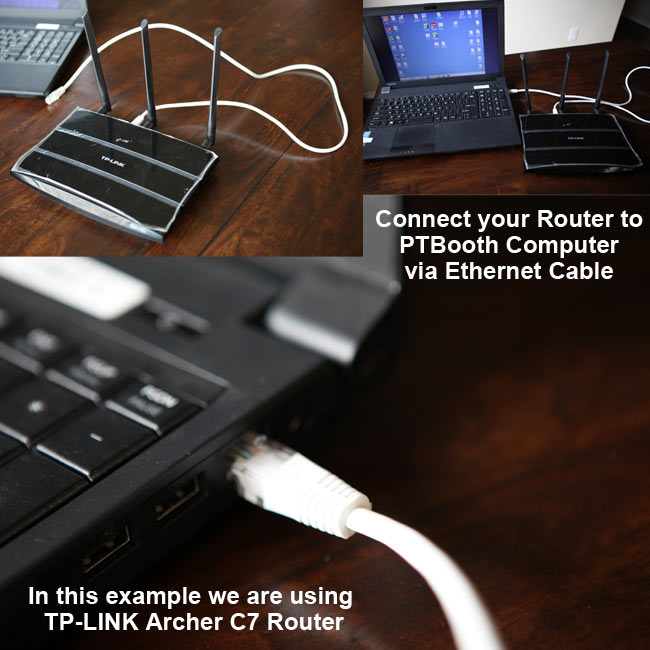
STEP 1. Connect WiFi Router
Connect the WiFi Router via Ethernet cable. The WiFi Hotspot will be created.
In this example we use TP-LINK Archer C7 Router.
STEP 2. Go to Network and Sharing Center
In your Network and Sharing Center you will see the Network (WiFi Hotspot) created after WiFi Router has been connected.
You will see your Netwok Name (SSID) (in this example it is TP-LINK_F1E3).
You may change your Netwok Name (SSID).
Refer to your wireless router manual how to change (SSID).
At this point you will be able to connect to your PTBooth computer via WiFi Network on external devices such as Phone or Tablet.
You may begin using PTBooth Transfer App by providing the Network access information: Network Name (in this example TP-LINK_F1E3) and Network access Password
However IF your Router has the ability to provide GUEST Network access we suggest to create and use the GUEST Network.
The reason is that you can setup the GUEST NETWORK that does not require password (key) to access.
Guest Network with access without password will simplify and speed up the process of connecting to your WiFi Hotspot for your customers.
NOTE! Your Guest Network will not be visible in your Network and Sharing Center

STEP 3. Create Guest Network Access on your Router (optional)
In the Router settings we configured the GUEST NETWORK «PhotoBooth» that does not require WiFi password (key) to access.
In this example we created the WiFi Guest Network "PhotoBooth" for 2.4 GHz and "PhotoBooth_5G" for 5GHz.
Also we elected "Disable Security" which means that the password to access this Guest Network is not required
As a result, in order to Download Photos our Customers only need to connect to PhotoBooth or PhotoBooth_5G WiFi Network without entering any passwords.
NOTE! Your Guest Network will not be visible in your Network and Sharing Center
Refer to your wireless router manual how to create Guest Network Access on your Router.
STEP 4. Identify your computer IP address
1. Click on Ethernet
2. Click on Details
3. Your IP Address is the numbers shown for IPv4 Address (in this example 192.168.0.12)
NOTE! Your IP Address could be different!
TEST YOUR WiFi Hotspot
STEP 1. Connect your Smartphone to the WiFi Hotspot
1. Open Smartphone WiFi Settings
2. Connect Smartphone to your WiFi Hotspot
2. Make sure the connection has been established Successfully
STEP 2. Enter IP Address into your Smartphone Browser (Firefox, Chrome etc.)
1. Open your Smartphone internet Browser (Firefox, Chrome etc.)
2. Enter your IP Address into Smartphone Browser
3. In this example our ID Address is 192.168.0.12
PTBooth Transfer App "Welcome" screen will appear
DONE. At this point you have Successfully created and tested the WiFi Hotspot and may begin using the PTBooth Transfer App
ALSO READ:
In Order To Operate PTBooth A1 PRO You Need The Folowing Devices:
PLEASE NOTE! In order to operate the PTBooth A1 PRO Software a certain computer knowledge is required.
What knowledge is required?
To use the PTBooth A1 PRO Photo Booth Software with ease, you will need the following knowledge and abilities:
- Ability and knowledge of how to setup a WiFi Hotspot (also known as wireless access point)
- Ability and knowledge of how to use and opreate a WiFi Router
- Ability to determine the IP address of your computer
- Have basic understanding of Network (how to setup WiFi Network and/or Troubleshoot)
- Ability to use and basic understanding of the Windows Operating System (how to use Control Panel, how to set Windows Settings etc.)
- Ability to Disable the Automatic Windows Update (depends on the OS you are using Windows 10 or Win 8, or Win 7)
- Ability to connect and use USB devices (such as Camera, Webcamera, Printer, Monitor etc.)
- Have basic understanding how to troubleshoot the USB devices
- Ability to install the Printer drivers and set Printer as Default Printer
- ABILITY TO CREATE AND MANIPULATE JPEG IMAGE using image editor (e.g. Adobe Photoshop, Windows Paint etc.)
- Ability to use and basic understanding of the Windows Shortcut Commands (Alt+F4 etc.)
- Basic understanding of the Windows Files and Folders operation (Specify/Find the file/folder location etc.)
- Ability to use and basic understanding of the Windows Task Manager
- ABILITY TO FOLLOW INSTRUCTIONS, TUTORIALS AND "HOW TO" ARTICLES
PLEASE NOTE! If you do not have the required knowledge in the areas mentioned above, you will not be able to operate the PTBooth A1 PRO.
Back to "How To Articles"


